Server Down Lagi dalam Proses Repair >> thanks

Diberdayakan oleh Blogger.

Judul Posting Anda Disini

Nama anda atau Author disini

Tulis sebagian postingan anda disini

Judul Posting Anda Disini

Nama anda atau Author disini

Tulis sebagian postingan anda disini

Judul Posting Anda Disini

Nama anda atau Author disini

Tulis sebagian postingan anda disini

Tampilkan postingan dengan label Repair Ponsel. Tampilkan semua postingan

Rabu, 02 November 2011

iPhone 4 4.3.2 Jailbreak Untethered Using Redsn0w 0.9.6rc14 Now Available

Redsn0w 0.9.6rc14 is now available which adds support for untethered jailbreak for iPhone 4 on the latest iOS 4.3.2 firmware. Those of you who rely on a carrier unlock MUST STAY AWAY from Redsn0w and stock iOS 4.3.2 firmware and wait for the updated version of Sn0wbreeze and PwnageTool.
Jailbreak iOS 4.3.2
For those of you who don’t know, iOS 4.3.2 was originally jailbroken last week using PwnageTool bundles (on Mac) but it was limited to tethered boot. But now with this latest version of Redsn0w, you can jailbreak your iPhone, iPad, and iPod touch fully untethered on the latest iOS 4.3.2 firmware.
Steps for jailbreaking iOS 4.3.2 untethered using Redsn0w 0.9.6rc14 are exactly similar to the last release. Simply download Redsn0w 0.9.6rc14 for Windows or Mac from the links given below, and then follow our detailed step by step instructions posted here to jailbreak iPhone 4, 3GS, iPod touch 4G / 3G, and iPad running the latest iOS 4.3.2 firmware.
Jailbreak
 iPhone 4 4.3.2
Download iOS 4.3.2 for iPhone 4, 3GS, 3G, iPad, iPod touch
Download Redsn0w 0.9.6rc14 for Windows
Download Redsn0w 0.9.6rc14 for Mac
Download iTunes 10.2.2 for Windows or Mac

Sumber 
Read More : iPhone 4 4.3.2 Jailbreak Untethered Using Redsn0w 0.9.6rc14 Now Available

Senin, 11 Juli 2011

[SOLVED] UFS HWK Error " Unexpected Exception: invalid Data Type For "


cara yg lebih simple,hasil copas dari tetangga.
hanya sedikit bermain di REGEDIT saja,NO INSTAL NO UNISTAL.

dengan langkah sebagai berikut.


- buka RUN ketik "regedit" tanpa tanda petik
- masuk ke HKEY_LOCAL_MACHINE > SOFTWARE > NOKIA MOBILE PHONES > TSSShared > Common > Inspatch
- Delete "REG BIN" di dalam "Inspatch"
- Klik kanan Inspatch > permissions > beri check list "Deny" > apply > OK

langsung test buka DCTxBB5 ngk mungkin error itu masih nongol.
test by me.

Semoga Berguna ;)
Read More : [SOLVED] UFS HWK Error " Unexpected Exception: invalid Data Type For "

Sabtu, 12 Februari 2011

Link Download OS Blackberry

Buat koleksi pribadi, saya share link download firmware Blackberry sesuai dengan operator masing-masing.
silahkan klik link di bawah ini :

Download via Desktop.

Africa

Asia Pacific

Europe

Latin America/South America

Middle East

North America

Atau anda bisa download Link di bahwah ini :
DISINI

atau

DISINI

Baca Cara Upgrade OS blackberry sebelum anda mulai upgrade.
Semoga berguna
^_^

Read More : Link Download OS Blackberry

Rabu, 09 Februari 2011

Jailbreak Apple menggunakan Limera1n

Limera1n telah dirilis hari ini oleh Geohot, silakan download untuk versi Windows DISNI

Limera1n menyupport iPhone 3GS, iPod Touch 3G, iPad, iPhone 4, iPod Touch 4G yang berjalan pada iOS 4.0, 4.0.1, 4.0.2, dan 4.1. Untuk melakukan jailbreak ikuti langkah-langkah dibawah.

warning: Lakukan dengan hati-hati, saya tidak bertanggung jawab atas segala kerusakan yang terjadi (resiko tanggung penumpang )

okelah kalo begitu kita lanjutkan :
1. Download Limera1n dari link diatas.
2. buka dan jalankan Limera1n (itunes harus sudah terinstal terlebih dahulu)
3. klik tombol “make it ra1n”
4. Kemudian iphone akan masuk ke recovery mode

Akan muncul pesan untuk menekan tombol Home dan tombol Power secara bersamaan
selanjutnya akan muncul pesan untuk melepaskan tombol Power (lepaskan tombol Power tapi tombol Home jangan dilepas)
Selanjutnya iphone akan masuk ke DFU mode
Kemudian limera1n akan melakukan proses jailbreak, pada saat itu akan muncul logo limera1n pada iphone anda


Setelah proses selesai, akan muncul pesan seperti ini:

5. Setelah kembali ke Homescreen, pastikan kalau icon limera1n sudah muncul, kik ikon tersebut untuk melanjutkan.

6. Saat limera1n terbuka, pilih Cydia dan klik tombol Install pada kanan-atas

7. Setelah Cydia berhasil diinstall, restart iphone anda.

Sumber
copy paste lagi asal gak ngerubah tulisan si penulis dan di sertakan link aslinya
bila abis limerain sukses terus cuman searching solusinya di unlock pake ultrasnow supaya tidak searching
bisa baca disini : Unlock iPhone 3G SU iOS 4
;)
Read More : Jailbreak Apple menggunakan Limera1n

Unlock iPhone 4 SU

Syarat dan Persiapan sebelum unlock dengan ultrasn0w:

* iPhone 4 SU sudah di-jailbreak dan di-upgrade ke OS 3.1.3 atau iOS 4 (sudah diterangkan di atas)
* Pastikan batere iPhone kita penuh sebab kita akan melakukannya secara online melalui wi-fi
* Harus ada internet secara wifi alias hotspot. Kita dapat membuat hotspot sendiri menggunakan router wi-fi, menggunakan mac sebagai router wifi, atau kita main ke mall, restorant yang menyediakan hotspot internet gratis.
* Persiapkan kartu selular (SIM card) original atau sejenisnya , pastikan sudah dipasang di iphone kita.


Langkah 1
Aktifkan wifi iPhone kita, dan hubungkan ke jaringan internet wi-fi

Langkah 2
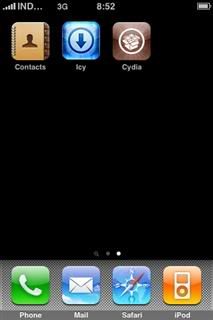
Tap aplikasi Cydia


Langkah 3

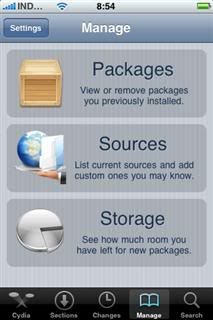
* Di menu pilihan di bawah pilih/tap ‘manage’
* Pilih/tap pilihan kedua yaitu ‘sources’


Langkah 4

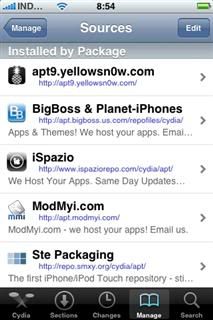
* Jika sudah masuk ke sources, tekan tombol biru bertulisan ‘Edit’ yang berada di pojok kanan atas
* Kemudian tekan/tap tombol biru bertuliskan ‘Add’ yang ada di pojok kiri atas


Langkah 5

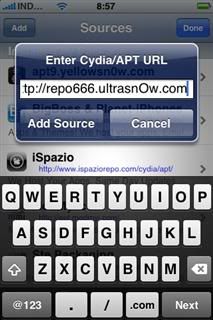
* Masukan/ketik alamat ini : http://repo666.untrasn0w.com
* Catatan : pada tulisan sn0w, ‘0’ itu adalah angka nol bukan O besar
* Tekan “Add source”
* Tunggu sampai sampai selesai dan muncul tulisan “complette”
* Jika gagal, ulangi lagi sampai tulisan “complete” benar-benar muncul
* Setelah berhasli tap tombol biru di bawah yang bertuliskan “Return to Cydia”


Langkah 6
Tekan tombol “Done”


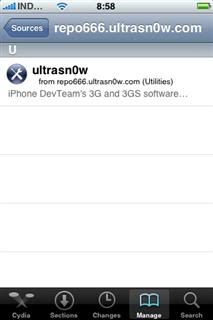
Pada layar Sources pilihlah menu “repo666.ultrasn0w.com”


Langkah 7
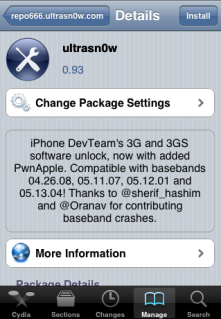
Tap aplikasi “untrasn0w”


Langkah 8
Tekan tombol biru bertuliskan “Install” di pojok kanan atas


Langkah 9

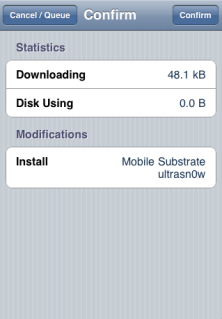
* Tekan/tap “Confirm”
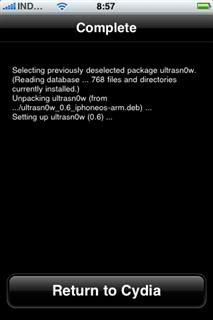
* Tunggu sampai selesai dan muncul tulisan “complete”
* Kembali ke “Return to Cydia”


Langkah 10


* Setelah itu tekan tombol home
* Mati kan iPhone kita dengan menekan power button kira-kira 3 detik sampai muncul "slide to power off”
* Hidupkan lagi iPhone kita.
* Selamat kita sudah me-unlock iPhone 4 SU

Sumber
Kembali lagi copy paste, masih butuh referensi
;)
Read More : Unlock iPhone 4 SU

Cara Jailbreak dan Unlock iPhone 4 iOS4

Tutorial kali ini adalah bagaimana cara jailbreak dan unlock iPhone 4 iOS4. Tools yang digunakan untuk jailbreak menggunakan jailbreakme.com karena sangat mudah dan cepat.

Jailbreak dengan jailbreakme.com

Pastikan iPhone 4 yg terlock dapat mengakses internet dengan wifi

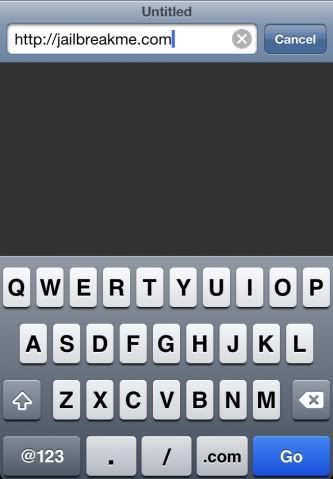
Tap Safari untuk mengakses situs jailbreakme.com


ketik http://jailbreakme.com dan Go


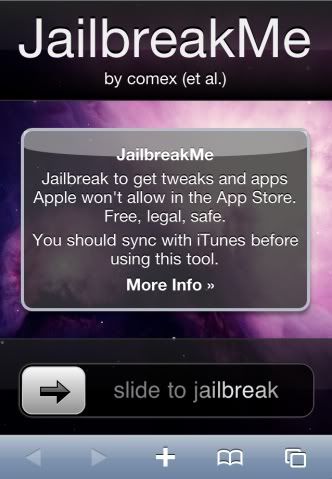
untuk memulai download dan jailbreak, Slide to jailbreak


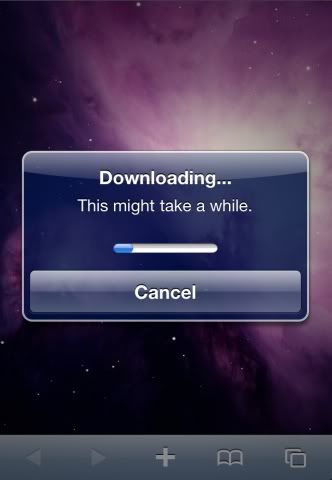
tunggu hingga tools jailbreak selesai didownload

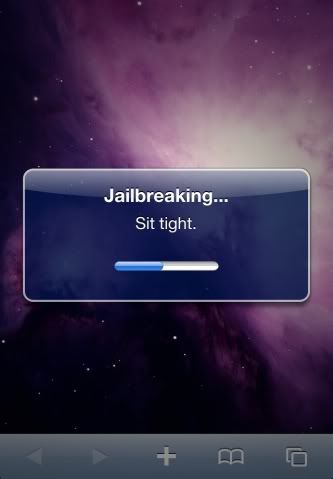
selesai dowload tools akan langsung melakukan jailbreak, tunggu hingga selesai


jika selesai akan ada notifikasi bahwa jailbreak selesai dan Cydia telah diinstall di home screen


Selamat kita sudah menjailbreak iPhone 4

Sumber
Lagi2 Copy paste, karena butuh referensi buat repair Apple iPhone
;)
Read More : Cara Jailbreak dan Unlock iPhone 4 iOS4

Unlock iPhone 3G SU iOS 4

Sekarang kita tidak perlu khawatir tentang unlock iPhone 3G SU yang sudah di upgrade ke OS 3.1.3 atau iOS4, berbeda dengan iPhone 3G FU setelah kita upgrade/restore ke OS 3.1.3 / iOS4 yang tidak memerlukan proses unlocking sebab memang iPhone 3G FU sudah di-unlock di pabrikasinya. Lagi-lagi DeV-Team sangat berjasa buat kita sebab hampir 2 minggu yang lalu mengeluarkan software yang sangat ringan yaitu kira-kira hanya 47 KB yang berfungsi untuk unlock iPhone 3G SU. Program itu bernama Ultrasn0w

Syarat dan Persiapan sebelum unlock dengan ultrasn0w:

* iPhone 3G SU sudah di-jailbreak dan di-upgrade ke OS 3.1.3 atau iOS 4 (sudah diterangkan di atas)
* Pastikan batere iPhone kita penuh sebab kita akan melakukannya secara online melalui wi-fi
* Harus ada internet secara wifi alias hotspot. Kita dapat membuat hotspot sendiri menggunakan router wi-fi, menggunakan mac sebagai router wifi, atau kita main ke mall, restorant yang menyediakan hotspot internet gratis.
* Persiapkan kartu selular (SIM card) kita, pastikan sudah dipasang di iphone kita.
* Persiapkan pembuka simtray iphone sebab pasti berguna untuk membuka SIM card

Langkah 1
Aktifkan wifi iPhone kita, dan hubungkan ke jaringan internet wi-fi

Langkah 2
Tap aplikasi Cydia


Langkah 3

* Di menu pilihan di bawah pilih/tap ‘manage’
* Pilih/tap pilihan kedua yaitu ‘sources’


Langkah 4

* Jika sudah masuk ke sources, tekan tombol biru bertulisan ‘Edit’ yang berada di pojok kanan atas
* Kemudian tekan/tap tombol biru bertuliskan ‘Add’ yang ada di pojok kiri atas


Langkah 5

* Masukan/ketik alamat ini : http://repo666.untrasn0w.com
* Catatan : pada tulisan sn0wm, ‘0’ itu adalah angka nol bukan O besar
* Tekan “Add source”
* Tunggu sampai sampai selesai dan muncul tulisan “complette”
* Jika gagal, ulangi lagi sampai tulisan “complete” benar-benar muncul
* Setelah berhasli tap tombol biru di bawah yang bertuliskan “Return to Cydia”


Langkah 6
Tekan tombol “Done”


Pada layar Sources pilihlah menu “repo666.ultrasn0w.com”


Langkah 7
Tap aplikasi “untrasn0w”


Langkah 8
Tekan tombol biru bertuliskan “Install” di pojok kanan atas


Langkah 9

* Tekan/tap “Confirm”
* Tunggu sampai selesai dan muncul tulisan “complete”
* Kembali ke “Return to Cydia”


Langkah 10


* Setelah itu tekan tombol home
* Mati kan iPhone kita dengan menekan power button kira-kira 3 detik sampai muncul "slide to power off”
* Hidupkan lagi iPhone kita.
* Selamat kita sudah me-unlock iPhone 3G SU !


Sumber
Hanya Copy Paste, buat referensi saja
;)
Read More : Unlock iPhone 3G SU iOS 4

Download iTunes dan Firmware Apple

Sekedar sharing tempat buat download iTunes dan Firmware Apple

1. Download iTunes terbaru www.apple.com
2. Download IOS atau OS atau gampangnya firmware yg akan kita gunakan untuk mengupgrde IPHONE http://www.felixbruns.de/iPod/firmware/ dan http://www.iclarified.com/entry/index.php?enid=750

atau anda bisa download DISINI

Untuk upgrade silahkan baca disini
http://www.andipunk.co.cc/2010/12/jailbreak-dengan-redsn0w-095.html

Untuk iphone 3G dgn modem firmware 05.14.02 belum bisa di-unlock, nunggu ios 4.2 keluar baru bisa
Good Luck
;)
Read More : Download iTunes dan Firmware Apple

Sabtu, 05 Februari 2011

Solusi Program Not Compability Windows 7

Salah satu tips dan trik akan coba saya paparkan tentang solusi aplikasi atau program tidak kompatible dengan Windows 7. Semakin maraknya pengguna win 7 dan juga program atau aplikasi yang tidak berfungsi di windows 7 di akibatkan karena program atau aplikasi yang di install hanya support oleh windows SP2, namun sebenarnya juga berfungsi di win 7.

Setelah anda membaca tips dan trik dari Instalasi Box Flasher di windows 7 sekarang saya akan melanjutkannya karena driver sudah terdeteksi namun program aplikasinya belum tentu bisa berfungsi.
Silahkan ikuti tutorial berikut :

  • Buka "Control Panel" kemudian klik "Find and Fix Problem" (System dan Security)
  • Kemudian klik "Run Programs made for Previous Versions of Windows" (Programs)
  • Maka akan muncul tampilan Program Compatibility kemudian klik "Next"
  • Windows akan mendeteksi program atau aplikasi sudah anda instal
  • Pilih / klik program yang anda ingin perbaiki atau yang tidak berfungsi di win 7 (select the program you're having problem with)
  • Klik "Next"
  • Muncul Select Troubleshooting option, kemudian klik " Try Recommended Settings"
  • Muncul tampilan Tes compatibility settings for the program kemudian klik "Start the Program"
  • Pada saat muncul tampilan User Account Control Pilih "Yes"
  • Setelah program aplikasi terbuka klik "Next" pada Program Compatibility (dimana anda tadi klik start the program)
  • Pilih "Yes, save these settings for this program" maka windows akan menyimpan settingan anda tadi
  • Kemudian klik "Close"

Selamat mencoba dan Good luck
;)
Read More : Solusi Program Not Compability Windows 7

MMC Password Finder

Terkadang pada Hp nokia mmc terprotek oleh password yang kita pasang, tapi untunglah bila password tersebut anda ingat, namun bagaimana bila anda lupa password tersebut ?
Saya searching di goggle dan menemukan sebuah tools MMC Password Finder dan saya akan coba sharing file tersebut dan cara penggunaannya.

MMC Password Finder
Bagaimana cara menggunakannya ?

* Backup PM area 302 atau full juga boleh, dengan Tool apa aja
* Jalan program ini
* Select PM File
* Klik Find

Silahkan anda Download Toolsnya MMC Password
Hanya dengan klik Skip AD di sebelah kanan atas
(Lewatkan iklan ya .... hi..hi...hi...)
Selamat Mencoba dan Good luck
:)
Read More : MMC Password Finder

GreenPois0n RC5 Untethered Jailbreak for iOS 4.2.1 Released

GreenPois0n RC5 Untethered Jailbreak for iOS 4.2.1 Released


Chronic Dev Team has finally released the much awaited GreenPois0n RC5 which brings full untethered iOS 4.2.1 jailbreak for all iOS devices. Unlike Redsn0w 0.9.7, GreenPois0n RC5 doesn’t require you to have SHSH blobs of 4.2b3 saved on Cydia. You can jailbreak any iOS device out of the box on iOS 4.2.1 using this latest version of GreenPois0n.

The following instructions will help you jailbreak iOS 4.2.1 on iPhone 4, 3GS, iPod touch 2G/3G/4G, Apple TV and Apple TV 2G using GreenPois0n.

NOTE: If your iPhone 4 rely on an unlock, do not update to iOS 4.2.1 yet as doing so will upgrade your baseband, making it impossible for now to unlock.

Step 1: Download GreenPois0n from the link given above.

Step 2: Connect your iPhone via USB to your computer and click on “Prepare to Jailbreak (DFU)”

Step 3: Now just follow the following onscreen instructions to enter DFU mode

Step 4: Your device is now ready for jailbreak. Click on “Jailbreak” to inject the exploit.

Step 5: Your iPhone, iPad or iPod touch should now be successfully jailbroken on iOS 4.2.1. Now start “Loader” found on the homescreen and install Cydia.

Guys, screenshots to follow, need to sleep now...

Sadly, only released for MAC users, Windows and Linux users will need to wait...

greenpois0n-osx_rc5.zip


STEP 1: Your device must be on iOS 4.2.1, then download GreenPois0n RC5 for Mac OS X from here. [Mirror]

STEP 2: Launch GreenPois0n RC5 then connect your iPhone into your Mac via USB and click onJailbreak as shown below:


STEP 3: Follow the instructions shown on the screen to enter DFU mode:

STEP 4: Once jailbroken, you'll get Cydia installed on your iOS device and you won't need to use Just tethered boot right now option anymore.


Read More : GreenPois0n RC5 Untethered Jailbreak for iOS 4.2.1 Released

Instalasi Box Flash di Windows 7

OS: Windows 7 Enterprise
Versi: 6.1.7600 (Win7 RTM)
Status: Activated
WPA: Genuine

Selama make sampe saat ini;
- Semua Program (terutama Software Handphone jalan normal)
- Semua driver Box/Dongle/Smartcard terinstall sempurna

Cara Install Driverbuat Box/Dongle

Lagi2 masalah upload gambar nih, gak ada gambar gak pa2 ya...

Biasanya kalo kita install driver Smartcard, sekalipun sukses dan bisa digunakan, pasti masih ada yang tidak terinsatall, cek di Device Manager > Other Devices > Smartcard (masih terdeteksi bahwa windows belum menginstall drivernya).
Kenapa? Karena windows tidak mengenali Sertifikat Smartcart Filter drivernya. Kita akan dapat sertifikatnya setelah melakukan Update Windows.

Solusi:
- Aktivasi "Windows", jadikan "Genuine"
- Install "WGAPlugin"
- Update Windows

Dimanakah Update File buat Smartcard kita? Caranya;
- Install semua driver Box/Dongle
- Konek ke internet.
- Klik Start Menu > Control Panel > Windows Update > Check for Updates, tunggu sampai daftar Update tertampil, kemudian diantara daftar akan ada menu update:
OEM - Other hardware - USB Token Device
OEM - Other hardware - USB Token Holder
FTDI - Other hardware - USB Serial Converter
FTDI - Other hardware - USB Serial Port
Update tersebut yang harus kita download buat box kita...
Download semua Update yang pokok, yang Optional tidak perlu, biarkan windows meng-update system, biasanya akan reboot.

setelah proses reboot dan kembali ke windows, kita buka kembali Device Manager, kemudian update driver buat Smartcard;
Caranya;
Klik kanan SmartCard > Update Driver Software > Browse my computer for driver software > Let me pick from a list of device driver on my computer > sorot ke Smartcard Filter Driver > Install Driver yang tersedia.
sekarang smartcard sudah terinstall dengan sempurna, tidak akan muncul lagi di Device Manager > Other Devices > Smartcard

Cara Aktivasi Windows 7 Enterprise #1

Lagi2 gak tau cara buat attachmentnya....

Cara aktivasi ini hanya berlaku buat edisi di bawah ini selainnya tidak bisa!
- Windows 7 Professional > dengan SN: FJ82H-XT6CR-J8D7P-XQJJ2-GPDD4
- Windows 7 Professional N > dengan SN: MRPKT-YTG23-K7D7T-X2JMM-QY7MG
- Windows 7 Enterprise > dengan SN: 33PXH-7Y6KF-2VJC9-XBBR8-HVTHH (Edisi ini yang tak pake)
- Windows 7 Enterprise E > dengan SN: C29WB-22CC8-VJ326-GHFJW-H9DH4
- Windows 7 Enterprise N > dengan SN: YDRBP-3D83W-TY26F-D46B2-XCKRJ

Langkah2nya:
- Install Windows 7 Enterprise (Fresh Copy)
- Nonaktifkan User Account Control
- Sinkronkan waktu dengan server Windows,yaitu di: Control Panel > Date and Time > Internet Time > Pilih time.windows.com
- Rubah Time Zone ke UTC+3, yaitu di: Control Panel > Date and Time > Change Time Zone > Pilih (UTC+03:00) Moscow, St. Petersburg, Volgograd

Cara Aktivasi Windows 7 Enterprise #2

Cara Aktivasi Windows 7 Enterprise #3

Dengan menjalankan file aktivasi berextensi .CMD dan sudah aku unggah ke sini

http://www.4shared.com/file/wJ_sv1sr/win7_activated.html


Setelah disimpan file tersebut, kemudian kita jalankan, caranya:

- Klik kanan file yang sudah kita buat tadi > Run as Administrator, kemudian akan otomatis membuka jendela Command Prompt
- Pilih Windows yang sesuai dengan yang kita install, disini saya pilih C, karena eidsi ini yang saya pakai. tunggu sampai selesai, disini harus tampil "Installed product key...sucessfully".
- Tekan sembarang tombol...
- Pilih C, tunggu sampai selesai, akan muncul "Key Management service...sucessfully"
- Tekan sembarang tombol...
- Tunggu sampai "Product activated succesfully"
- Tekan sembarang tombol...
- Akan melakukan validasi otomatis
- Tekan sembarang tombol, akan keluar dari menu Command Prompt
Jika proses yang dijalankan sudah sesuai prosedur, seharusnya sekarang Widows sudah ter-Activated dan status WPA-nya adalah Genuine.
Cek di Control Panel > System, disitu harus tertampil Windows is Activated dengan Genuine Logonya...
Install WPAPlugin-nya, windows siap di-Update dan akan langsung diverifikasi "Genuine"...

File Windowsnya :
http://www.torrentbit.nl/get/1605312

e-gate SmartCard Driver for Windows 7

Driver SmartCard e-gate based, compatibel buat windows 7, stabil.
Tested Box; Infinity, SEtool3 Gold
Result; Dipakai bersamaan tidak CRASH.
Tested Flash:
- SE J100, Tool pake Infinity, Interface SEtool3.
- Tool dibuka bersama, Infinity dan SEtool, proses Flashing lancar, koneksi stabil.

Driver download disini...
http://rapidshare.com/files/50293042/e-gate_PC_SC_Vista_32bit_driver__MSI_Installer_.msi

Tips instalasi:
- Klik kanan File Driver > Properties > Compatibility > Run this program in compatibility mode for: Previous version of windows.
- Jalankan instalasi driver.

Semoga membantu,


Selamat mencoba.
Sumber
Read More : Instalasi Box Flash di Windows 7

Rabu, 02 Februari 2011

Profile Headset Hp Cina

Hp cina apapun jenis bila muncul headset atau default profile headset, anda bisa melakukan tips dan trik repair headset dibawah ini:

1. Buka chasing Hp dan dinyalakan menggunakan bateray
2. Nyalakan power suplay dan atur tegangan power suplay di 2.8 Volt
3. Pasang kabel ground power suplay ke ground PCB Hp
4. Berikan tegangan power suplay 2.8 V ke kaki-kaki plug-in handsfree sambil diperhatikan layar lcd pada titik mana tegangan tadi bisa merubah profile handsfree
5. Bila ada yang berubah, jumper tegangan 2.8 V ke titik tersebut dari tegangan kerja lainnya
6. Good Luck

Semoga bermanfaat
Read More : Profile Headset Hp Cina

Senin, 17 Januari 2011

Insert Sim [solved]

Sebuah tips dan trik dari repair handphone akan saya coba paparkan semoga dapat membantu semua problem teman-teman pada kasus insert sim untuk handphone nokia 1600, 2310, 6100, 3220, 1110, 1661 dan lainnya atau pada kasus DCT4, sebenarnya ini juga berlaku pada semua handphone.

Intinya bagaimana kita menganalisa kerusakan itu sendiri sehingga pada proses pengerjaan atau perbaikan ponsel tidak mengakibatkan resiko yang fatal. Ok kita mulai saja tips dan trik nya :

Solusi insert sim pada handphone khususnya pada nokia 1600, 2310, 6100, 3220, 1110, 1661 dan lainnya [DCT4] sebagai berikut :
1. Sebelum kita memvonis bahwa kerusakan pada kasus masukkan sim itu pasti IC sim card yang bermasalah ada baiknya kita mengukur tegangan Vsim lebih dahulu dan mengukur capasitor [C] di jalur Vsim apakah short atau tidak.
2. Apabila kasus masukkan sim setelah kita ukur capasitor [C] terjadi shot maka langsung di ganti saja atau dibuang saja, sampai disini sudah pasti problem insert sim sudah selesai.
3. Namun apabila capasitor [C] tidak terjadi short langkah berikutnya silahkan ukur konektor sim dengan menggunakan avo meter apakah terjadi short antara satu dengan yang lain ? Bila terjadi short sudah dipastikan bahwa IC sim card rusak dan harus di ganti atau di jumper
4. Bila tidak terjadi short pada kaki konektor sim card, silahkan ukur kembali kaki konektor sim card di hubungkan dengan ground masih menggunakan avo meter. Prob merah [+] di tempatkan pada ground Hp dan prob hitam di gunakan untuk mengukur kaki konektor sim card.
5. Apabila setelah di ukur resistansi pada avo meter pada skala 10x jarum naik kurang lebih di angka 4 itu pertanda ic sim card bagus, namun bila ada kaki konektor pada saat di ukur jarum avo meter tidak menunjukkan + angka 4 sudah pasti ic sim card rusak harus di ganti atau di jumper [catatan : ada satu kaki konektor yang tidak berfungsi atau no connect / nc silahkan lihat di skema].
6. Solusi terakhir silahkan ukur Vsim dari hp tersebut dengan menggunakan avo meter digital, tegangan yang keluar dari Vsim sebesar 1,8v / 3v, bila tidak ada tegangan keluar langsung jumper saja dari tegangan Vflash1 ke tegangan Vsim.
Untuk lebih jelas silahkan di lihat gambar berikut solusi insert sim :

yang di lingkari merah [C] silahkan di buang bila terjadi short

Gambar diatas adalah tips trik jumper ic sim card
Semoga berguna ;)
Read More : Insert Sim [solved]

Senin, 10 Januari 2011

Buka Casing Blackberry 9550 Storm 2

Cara Buka Casing Blackberry 9550 Storm 2 gak rumit kok, banyak orang harus ganti handphone orang karena terlalu ceroboh/gegabah dan menganggap mudah segala sesuatu, mari kita ikuti langkahnya berikut ini :

1. Pertama buka penutup batteray beserta batteraynya,
2. Buka penutup atas dan bawah yang ada di antara layar
3. Buka semua baut, baut cuma ada 6 buah
4. Congkel keatas yang tadi sudah anda buka penutup atas dan bawah
5. Maka akan terangkat keatas beserta layarnya

Untuk lebih jelasnya silahkan download video Buka Casing Blackberry 9550, klik link dibawah ini

Buka Casing Blackberry 9550

Good Luck
Read More : Buka Casing Blackberry 9550 Storm 2

Sukses Unlock dan Flashing Samsung C3303K

Samsung GT-C3303K champ awalnya kode kunci telepon, karena tidak bisa di reset manual jadi harus di flash atau di unlock, ok langsung kita mulai saja trik dari unlock samsung C3303K :

1. Siapkan kabel micro-UART cable BY z3x, berikut gambar

2. Kabel diatas juga bisa di gunakan atau di sambungkan dengan RJ45 UFS tapi kali ini saya cuma posting unlock Samsung C3303K by Z3X dengan menggunakan kabel RJ45, berikut gambar pinout Z3x :

3. Kemudian silahkan sambung masing-masing kabel sesuaikan [ground = ground, Rx = Rx, Tx = Tx) atau silahkan lihat kode berikut
 RJ45                       kabel usb/micro uart
  • no. 7 -------------- no. 4 dan 5
  • no. 2 -------------- no. 2
  • no. 3 -------------- no. 3
4. Ingat harus menggunakan R sebesar 530K antara kabel no.4 dan no.5 pada konektor usb.
5. Kemudian  buka program samsung tools dari z3x, pilih samsung C3303K
6. Konekkan kabel micro uart pada Handphone, lalu colokkan RJ45 pada box z3x (batteray belum di pasang)
7. Klik unlock tunggu hingga muncul tulisan seperti di bawah ini :
Selected model: C3303
Selected com port: COM4
Selected speed port: 921600
Please, connect phone and press power button 3 seconds
8. Lalu pasang batteray dan tunggu hingga proses done. Lihat log hasil unlock berikut :
Selected model: C3303
Selected com port: COM4
Selected speed port: 921600
Please, connect phone and press power button 3 seconds
Phone Detected
Sending loader1... OK
Flash ID: 08
Sending loader2... OK
Unlock - ok
If lock - not deactivate: Please make full reset *2767*3855# + input code #7465625*638*00000000#
Elapsed time: 105 second, sw ver: 3.4.0068

9. Selamat anda sudah selesai unlock Samsung C3303K
Problem Solved unlock samsung c3303K

nb: untuk proses flasing langkah-langkahnya sama seperti diatas, tinggal masukkan file flash sesuai dengan bahasa yang di inginkan, untuk bahasa Indonesia menggunakan kode "DX" tanpa tanda kutip

Good luck ;)
Read More : Sukses Unlock dan Flashing Samsung C3303K

Senin, 03 Januari 2011

Cara Flash Bahasa Indo ke Blackberry

Bagaimanakah cara flash bahasa indonesia ke BlackBerry ?
syaratnya silahkan download dulu aplikasi :

Download dulu BlackBerry Master Control Program (MCP)
silahkan download MCP

Download Bahasa Indonesia versi 5 keatas, ini di gunakan untuk type blackberry yang menggunakan OS versi 5 keatas
silahkan BI Versi 5 keatas

Download Bahasa Indonesia versi 5 kebawah ini di gunakan untuk type blackberry yang menggunakan OS versi 5 kebawah
silahkan BI Versi 5 kebawah

1.Setting USB Device
2.Kelik JAVA Loader Setting Device
3.Masukan Semua File yang Berextensi .cod
4.Tingaal tekan Load....!
5. Sesudah Proses Selesai Maka BlackBerrynya akan restar..!
6. BlackBerry Siap di BI..!
7. Silahkan masuk ke pengaturan HP >>opsi>>language>> pilih bahasa indonesia
8. Save
Selamat flash bahasa Indonesia ke Blackberry sudah selesai

tested bb 83xx,85xx,8830,89xx,90xx,95xx,96xx
tess ted 8310,8320.8900,9000,9500 suksess full

Good Luck
Read More : Cara Flash Bahasa Indo ke Blackberry

Tools Flasher Blackberry

Selain desktop manager ada juga tools lain yang bisa anda gunakan untuk ugrade Backberry, silahkan ikuti tutorialnya :
1: Download dan run yang flash file blackberry (tidak perlu desktop manager blackberry install)
    Download Flasher blackberry
2: Hapus file vendor.xml terletak di c: \ program files \ file umum \ penelitian dalam gerakan \ apploader
3: Hubungkan perangkat BlackBerry Anda ke komputer
4: Lanjutkan ke bagian ujung sampai Anda melihat tombol "Finish"
5: Cukup klik tombol selesai ....
6: Menunggu untuk perangkat lunak perangkat Anda telah diperbarui berhasil


Untuk lebih detail tentang bagaimana cara flash dan upgrade blackberry, silahkan masuk disini
http://www.andipunk.co.cc/2011/01/reload-operating-system-on-nuked.html
dan disini
http://www.andipunk.co.cc/2011/01/cara-flash-upgrade-blackberry.html

good luck
Read More : Tools Flasher Blackberry

Reload the Operating System on a Nuked BlackBerry

The Nuked Berry Problem
The fundamental problem with the Nuked Berry scenario is that because the device is stuck in a permanent reboot sequence or loop, when you attach it your computer via USB cable it simply connects and disconnects over and over and over again (you’ll just keep hearing that USB detected/unplugged noise) as the BlackBerry turns on/off. This makes using the BlackBerry Desktop Manager software to reload your OS impossible as the device is only detected for a couple of seconds before the device shuts off (and is now undetected).
Nuked Berry
My Nuked Berry...just a second before the display shuts off
and the device reboots itself, again and again and again
With pulling your BlackBerry’s battery doing nothing to solve the problem and it being impossible to establish a link to your desktop, at this point if you called your carrier for support there’s a chance they’ll tell you your BlackBerry is broken and that it’s time for a new one. To me that’s not a bad thing (what’s better than getting a new BlackBerry?!), but it’s not the CrackBerry way! Let's fix it!

Requirements/Disclaimer

Before reloading the operating system on a Nuked BlackBerry, you need to make sure you have taken care of some basics:
  • you are using a Windows Computer
  • have BlackBerry Desktop Manager installed
  • have the BlackBerry Operating System you want to install/reload onto your Nuked BlackBerry installed
You can download the latest version of BlackBerry Desktop Manager (version 4.3) from the BlackBerry.com website, and you can find the latest Operating System available for your device from your Carrier’s website.
Keep in mind that during this process you don’t necessarily have to reload the same version of the OS that’s currently running on your Nuked BlackBerry. With the example I’m going through today, I’m actually going to revert to a slightly older operating system. Remember that OSv4.3.1 Beta for the Curve I got my hands on a few weeks back? Well, it turns out it had a slight glitch that made it want to occasionally reboot the phone when I answered incoming calls (which I was living with ok), but after Nuking my Berry yesterday while testing some software a friend of mine is working on I decided to take the opportunity to revert back to the very stable OSv4.2.2. To accomplish this, on my computer I first open Control Panel > Add/Remove Software and uninstalled the current Operating System for the 8300 Curve. From there I went to AT&T’s website and downloaded and installed OSv4.2.2.
And now for the disclaimer, aka Bad News. With the process I’m going through here, any 3rd party applications you have installed on your BlackBerry will be lost. This install gives you a clean slate, which is a heck of a lot better than a Nuked Berry. So once you’re up to speed, you will have to install all your favorite apps once again.
The following process doesn't just work for Nuked BlackBerrys. You can also use it to clean the slate/reload/update the OS on a BlackBerry that's in fine working order.
How to Reload the Operating System on a Nuked BlackBerry
Step #1: Make sure your BlackBerry IS NOT connected to your computer. Locate and Open the App Loader application. You won't have a shortcut to this program on your start menu. You need to locate it manually. Open your file browser, go to your C Drive (operating system drive) and navigate your way through the folders to Program Files > Common Files >Research In Motion > AppLoader.  Once you are in the AppLoader directory, double click on the Loader application shortcut. Once Loader opens, you can click Next  and then proceed to Step #2. As you may have noticed, we skip Desktop Manager altogether.
AppLoader Directory
Step 1: Browse your way into the AppLoader Directory, and Open the Loader Application
Loader Homescreen
The Loader Homescreen. You can Click Next to Continue
Loader Screen - Com 1
After you click next, Loader Waits for you to Connect the Device.
Proceed to Step #2

Step #2:
We need to connect the BlackBerry to the Computer via USB cable. But here's where the tricky part comes in with the Nuked BlackBerry. Do you see in the image above where it says COM1? What we want to do is plug in the BlackBerry, and when COM1 switches to say USB-PIN:UNKNOWN we immediately click Next. This catches the BlackBerry and takes it out of the constant reboot cycle and allows you to then reload the Operating System.
Tip: The USB-PIN:UNKNOWN option will display for a few seconds when the BlackBerry is first connected/flashing its LED in red. With a Nuked BlackBerry,  That occurs when the device is in the initial start-up part of it's reboot sequence. The easiest way to get that to happen (vs. waiting for that step in the reboot sequence where you have a tenth of a second to hit Next before you lose your chance) is to simply pull the battery from the BlackBerry. With the battery pulled, connect the BlackBerry to the USB connector and as SOON as you see USB-PIN:UNKNOWN hit Next. You have to be quick still, but using this method you are in control of the timing. From there you can put the battery back in and battery cover back on (Make Sure you install the battery or else when the OS update is completing and the device disconnects from the computer to reboot, it will lose the power provided by the USB connection and you will get an error and have to do it all over again!).
** If you don't get it right the first time, try again (unplug from USB, pull battery, connect and hit Next while USB-PIN:Unknown is showing). You have to be fast and the timing is key, so it may take you three or four tries.  
USB:UNKNOWN
Connect Your BlackBerry via USB. Click NEXT as Soon as USB:UNKNOWN Appears
 
Battery Out
Tip: With Battery Out, Connect BlackBerry to USB.
This will give you more control in nailing the timing of
connecting Next while USB:UNKOWN displays
Step #3: With your BlackBerry now out of the permanent reboot sequence, you are essentially in the clear and well on your way to having your BlackBerry up and running again. Choose the options you want to install on your BlackBerry (BrickBreaker, BlackBerry Messenger, BlackBerry Maps, etc.), click next, then approve the installation by clicking "Finish." Sit back and relax while the BlackBerry does its thing. It'll take some time and go through a number of screens but eventually you will reach my favorite "The loading operation was successful" screen. Your BlackBerry will reboot itself at this point and it will take a LONG time to reboot (10 - 15 minutes or so). You can unplug it from the USB (it's not connected while rebooting) and just continue to sit back and wait. Get scared, but not too scared...it will eventually boot up.
OS Installation Options
Select the OS options you want to install
Approve OS install
Approve the Operating System Installalation Options
Sit Back and Relax
Sit back and relax and let the installer do its thing
Installation Complete!
Installation Complete! Just sit back and let your BlackBerry Reboot
Step #4: That's it! You are done. Brand New BlackBerry. With your BlackBerry no longer Nuked, you can run through the Set Up Wizard (set the date/time/fonts, etc.) and from there you WILL NOW BE ABLE TO connect to the BlackBerry Desktop Manager software. Hopefully you occasionally back up your data and can now use Desktop Manager's restore function to load up your backed up data. If not, hopefully you have your contacts all synced to Outlook so you can reload your Address book from there. Once that's done, it's time to install all your favorite apps again! I'd recommend starting with the CrackBerry.com Launcher (visit http://wap.crackberry.com on your BlackBerry's browser to download it!). Happy BlackBerrying!
Desktop Manager Reload
At least in this case I KNEW I was putting some risky software onto my BlackBerry
so before installing did a backup of my data. Once I un-nuked my BlackBerry
I was able to relatively quickly get back to where I was before.
Until Next Time
That's all folks! This is one of those lessons that I hope you don't need to use, but if you ever do find yourself with a Nuked BlackBerry I hope this lesson gets you back up and running quickly. And if you're still stuck, the CrackBerry Forums are only a click away!
 
Article Tags: blackberry hardware loop, blackberry reboot loop, hard reset, blackberry, pearl, curve, 8100, 8110, 8120, 8130, 8700, 8703, 8300, 8310, 8320, 8330, 8800, 8820, 8830, reload operating system

Sumber
Good Luck
Read More : Reload the Operating System on a Nuked BlackBerry
free counters PageHeat Ping your blog, website, or RSS feed for Free

  © Free Blogger templates The Robotic by Kang Oemar templates 2009
Kembali Ke : ATAS